Frequently Asked Questions
App Version: 3.1.2 onwards
Getting Started
To get started, click the FaceScreen icon in Launchpad or type "FaceScreen" in Spotlight and press Return. After that, a small FaceScreen icon appears in the menu bar. Click it to start FaceScreen. You can also toggle FaceScreen with keyboard shortcuts.
FaceScreen is a macOS menu bar app, so you won't see its icon in the Dock like conventional apps—you'll see it only in the menu bar. If there's not enough space in your menu bar, you may not see the FaceScreen icon. To resolve this, use an app like Ice (free and open source) to declutter your menu bar and free up space. Watch this video to see it in action.
FaceScreen keeps running in the background and shows its camera view on top of whatever else you are doing:
- Open FaceScreen and customise the camera view to your liking.
- Switch to another app. The floating camera view stays on top.
- If you are recording, start Screen Recording from Control Center. Your screen is captured with the camera view already on it.
The camera view stays on screen until you close FaceScreen itself. To hide it, tap the camera view to bring FaceScreen to the front, then close the app from the App Switcher. See "How do I close the app on iPhone or iPad?" below for the full steps.
There is no quit button inside FaceScreen. The floating camera view stays on screen until you close the app itself.
- Tap the floating camera view to bring FaceScreen back to the foreground.
- Swipe up from the bottom edge of the screen and pause to open the App Switcher. On an iPad with a Home button, double-click Home instead.
- Swipe up on the FaceScreen card to close the app.
The camera view disappears as soon as the app is closed.
Ring Light is a Mac-only feature. It is not available on iPhone or iPad.
Multiple camera views work differently on each platform. On Mac, you can connect several cameras to your computer and show a separate view for each one. On iPhone and iPad, you can show the front and back cameras on screen at the same time.
Yes, you can purchase FaceScreen directly on the website. After a successful payment, you'll receive a macOS .dmg installer and a license key to activate the app on your device.
This route is macOS only. The iPhone and iPad versions are sold through the App Store, so buying directly from the website does not include them.
Camera View
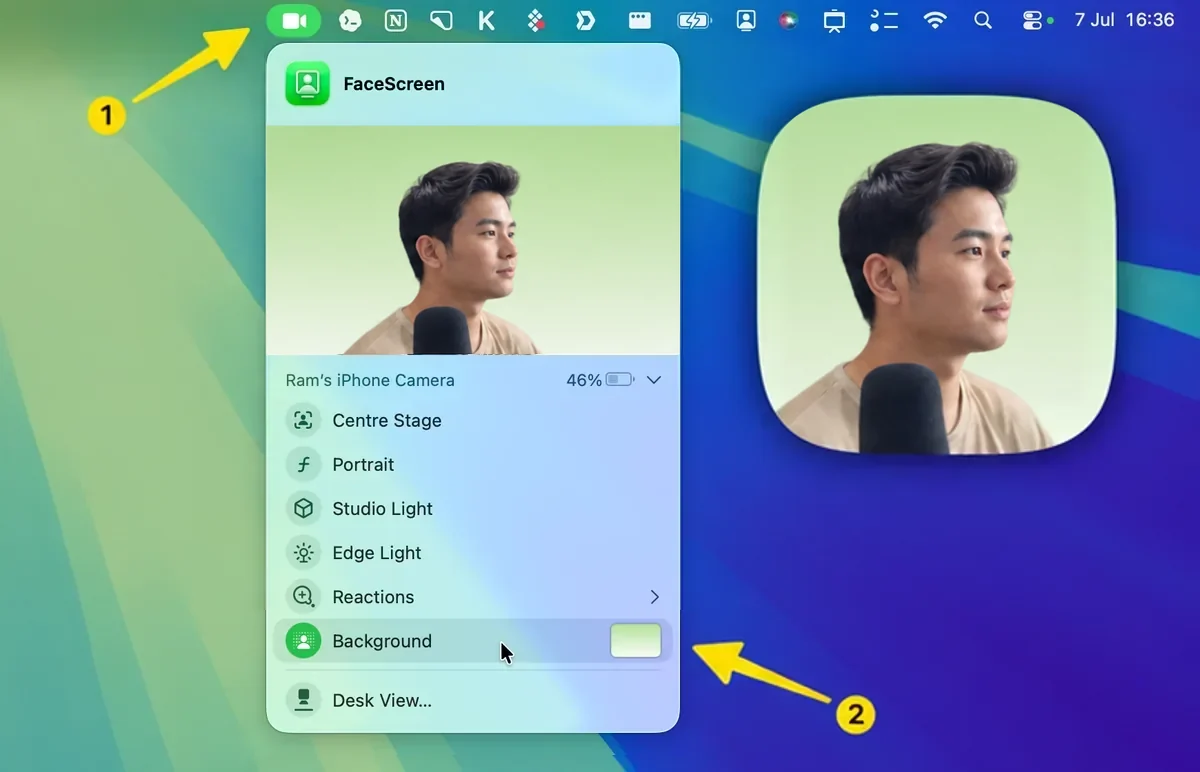
Yes. FaceScreen supports background changes through macOS's built-in video effects, so you do not need to configure this separately inside FaceScreen.
- Start FaceScreen so the camera view is active.
- Click the green video icon in the macOS menu bar, then use the Background option to change the camera background.
FaceScreen first tries to use the cameras you enabled in Settings > Camera. If one of those cameras is missing from macOS's connected camera list, FaceScreen waits briefly in case it reconnects.
- If your selected camera comes back, FaceScreen shows that camera automatically.
- If none of your selected cameras are connected after the short wait, FaceScreen can temporarily show the Mac's default available camera so you are not left without a camera view.
- If your selected camera is connected but cannot start a live feed, FaceScreen retries briefly, then shows a camera unavailable message with a button to open Camera settings.
- When your preferred camera becomes available again, FaceScreen switches back to it and removes the temporary fallback camera.
Apps appear in macOS Camera permissions only after they request camera access. The usual fix is to open FaceScreen, choose Start FaceScreen, and let macOS show the permission prompt. When you see "FaceScreen wants to access the camera", click Allow. FaceScreen should then appear in the Camera permissions list.
If it still doesn't appear, quit FaceScreen and reset camera permissions in Terminal:
tccutil reset CameraThen reopen FaceScreen and choose Start FaceScreen again. This resets the Camera privacy database, so apps may ask for permission again.
For best results, make sure FaceScreen is installed in /Applications. If it is running from Downloads, a mounted .dmg, or a temporary folder, move it to Applications and reopen it.
Text Overlay
The Text item in the menu bar is a global show/hide switch. It does not change which cameras have text enabled.
- Use
Settings > Textto choose which camera views are allowed to show text. - Use the menu bar Text item or text shortcut to hide or show text across those camera views.
- A text overlay appears only when text is enabled for that camera and the global Text switch is also on.